목표
- 에디터 및 인게임에서 언제든 기능에 연결된 사용자 마우스, 키보드 바인딩을 변경할 수 있는 기능 구현
- 전체 입력 바인딩을 직렬화하여 저장하고 불러올 수 있는 기능 구현
유니티의 입력 시스템
- 유니티에는 2가지 Input System이 있다.
- 첫 번째는
Input.Get~꼴의 메소드를 이용해 이번 프레임에 해당 입력이 있었는지 검사하는 레거시 시스템 -
두 번째는 2019년 소개된 New Input System.

- New Input System을 사용하려면
- 패키지 매니저에서 Input System을 설치하고,
- 프로젝트 세팅에서 Active Input Handling을 지정하고,
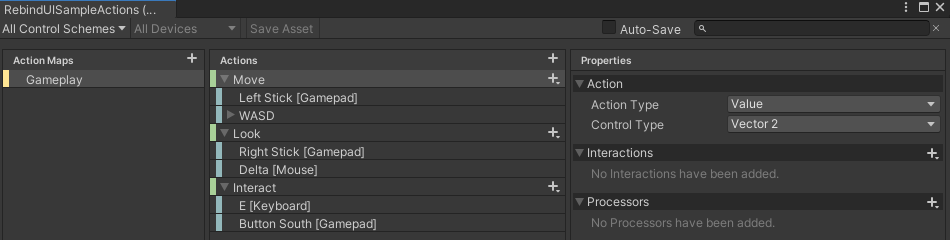
- InputAction 윈도우에서 Action Map, Action, Property를 설정하고,
- New Input System을 사용할 게임오브젝트에 PlayerInput 컴포넌트를 넣고,
- 이제 스크립트에서 콜백 메소드를 작성해서 입력을 처리한다.
- 솔직히 좀 번거로운 면이 있다.
- 그리고 여기서 가장 중요한 런타임 바인딩 변경 기능.
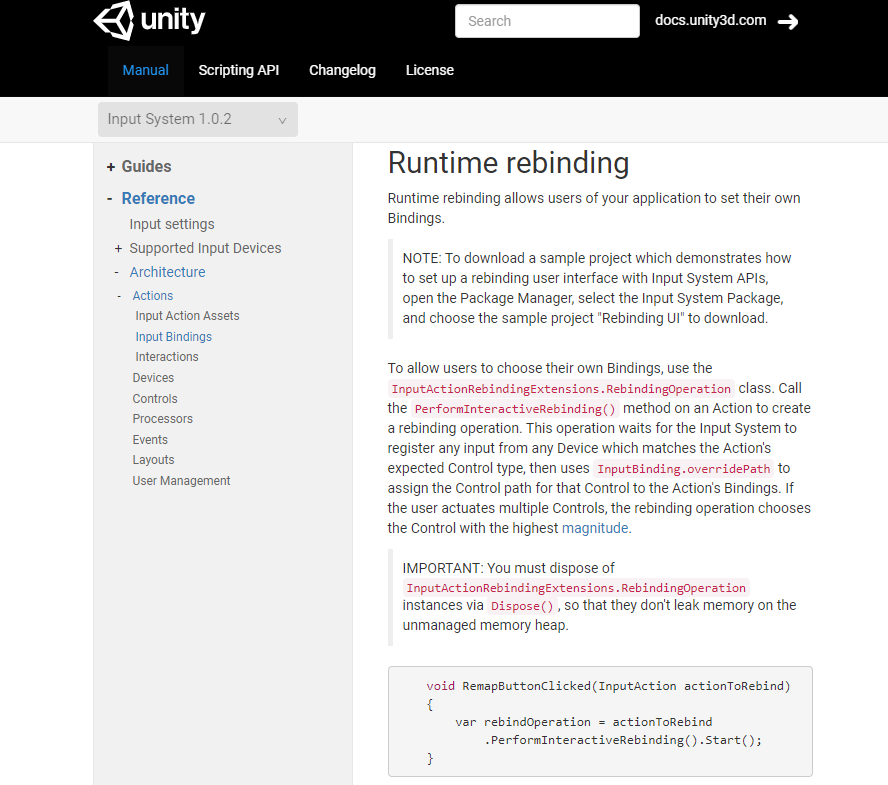
-
https://www.youtube.com/watch?v=dUCcZrPhwSo&ab_channel=DapperDino 여기에도 친절하게 설명되어 있다.
-
바인딩 JSON 세이브 로드 기능은 https://forum.unity.com/threads/how-to-save-input-action-bindings.799311/ 여기서 찾을 수 있었다.
-
그나마 레거시에 비해 바인딩 시스템이 이미 만들어져 있다는 장점이 있지만, 어쨌든 새로운 입력 시스템은 사용하기에 너무 번거롭다는 느낌이 강하다.
-
그래서 기존의 입력 시스템으로 실시간 변경과 직렬화가 가능한 바인딩 시스템을 만들어보려고 한다.
1. 기능과 입력의 분리
-
기능 또는 사용자의 행동과 실제 입력값을 분리해야 한다.
-
예를 들어 기능은 MoveLeft, MoveRight, Jump 등이 있고, 실제 입력값은 Input.GetKeyDown()의 파라미터로 넣어주는 KeyCode.A, KeyCode.D, KeyCode.Space 등이 있다.
-
바인딩을 고려하지 않는다면 곧장 Input.GetKeyDown(KeyCode.A) 꼴로 사용하게 되는데, 입력값을 의미하는 KeyCode를 직접 사용하지 않고 기능과 관련된 코드를 사용하도록 만들어야 한다.
- 따라서 게임 내에서 사용할 기능들을 미리 정의한다.
- int, string으로 0, 1, 2 …, 또는 “MoveLeft”, “MoveRight”, … 꼴로 만들 수도 있지만,
- 정수형은 직관적이지 않고 string은 오탈자를 유발할 수 있으므로 enum으로 정의한다.
- 레거시 입력 시스템의 입력값은 키보드는 KeyCode, 마우스는 정수 값을 사용한다.
- 그런데 KeyCode에 마우스 입력값도 Mouse0 ~ Mouse6까지 포함되어 있으므로 KeyCode로 통합하여 사용할 수 있다.
- 사용자 행동(기능)에 대한 enum을 다음과 같이 정의한다.
1
2
3
4
5
6
7
8
9
10
11
12
13
14
15
16
public enum UserAction
{
    MoveForward,
    MoveBackward,
    MoveLeft,
    MoveRight,

    Attack,
    Run,
    Jump,

    // UI
    UI_Inventory,
    UI_Status,
    UI_Skill,
}
2. 바인딩 구현
- 기능에 따라 KeyCode 값을 참조할 수 있도록 하려면 간단히 딕셔너리를 사용하면 된다.
1
private Dictionary<UserAction, KeyCode> _bindingDict;
3. 바인딩 클래스 작성
- 딕셔너리만을 사용해 곧장 바인딩 기능을 사용할 수 있으나, 모듈화하여 바인딩을 프리셋으로 사용하고 저장, 불러오기도 할 수 있게 할 것이므로 클래스로 묶어 작성한다.
1
2
3
4
5
6
7
8
9
10
11
12
13
14
15
16
17
18
19
20
21
22
23
24
25
26
27
28
29
30
31
32
33
34
35
36
37
38
39
40
41
42
43
44
45
46
47
48
49
50
51
52
53
54
55
56
57
58
59
[Serializable]
public class InputBinding
{
    public Dictionary<UserAction, KeyCode> Bindings => _bindingDict;
    private Dictionary<UserAction, KeyCode> _bindingDict;

    // 생성자
    public InputBinding(bool initalize = true)
    {
        _bindingDict = new Dictionary<UserAction, KeyCode>();

        if (initalize)
        {
            ResetAll();
        }
    }

    // 새로운 바인딩 적용
    public void ApplyNewBindings(InputBinding newBinding)
    {
        _bindingDict = new Dictionary<UserAction, KeyCode>(newBinding._bindingDict);
    }

    // 바인딩 지정 메소드 : allowOverlap 매개변수를 통해 중복 바인딩 허용여부를 결정한다.
    public void Bind(in UserAction action, in KeyCode code, bool allowOverlap = false)
    {
        if (!allowOverlap && _bindingDict.ContainsValue(code))
        {
            var copy = new Dictionary<UserAction, KeyCode>(_bindingDict);

            foreach (var pair in copy)
            {
                if (pair.Value.Equals(code))
                {
                    _bindingDict[pair.Key] = KeyCode.None;
                }
            }
        }
        _bindingDict[action] = code;
    }

    // 초기 바인딩셋 지정 메소드
    public void ResetAll()
    {
        Bind(UserAction.Attack,       KeyCode.Mouse0);

        Bind(UserAction.MoveForward,  KeyCode.W);
        Bind(UserAction.MoveBackward, KeyCode.S);
        Bind(UserAction.MoveLeft,     KeyCode.A);
        Bind(UserAction.MoveRight,    KeyCode.D);

        Bind(UserAction.Run,          KeyCode.LeftControl);
        Bind(UserAction.Jump,         KeyCode.Space);

        Bind(UserAction.UI_Inventory, KeyCode.I);
        Bind(UserAction.UI_Status,    KeyCode.P);
        Bind(UserAction.UI_Skill,     KeyCode.K);
    }
}
- 클래스로 묶었으니, 각각의 바인딩 프리셋을 만들고 객체를 변경해가며 서로 다른 바인딩을 사용할 수 있다.
4. 직렬화 가능한 클래스 작성
- 중요한 문제점이 있는데, 일반적으로 딕셔너리는 직렬화가 안된다.
- 따라서 저장 및 불러오기 기능을 위해 직렬화 가능한 형태의 새로운 클래스를 작성한다.
- 간단히 KeyValuePair<>를 쓰려 했지만, KeyValuePair도 직렬화가 안되기 때문에 새로운 Pair 클래스도 작성한다.
1
2
3
4
5
6
7
8
9
10
11
12
13
14
15
16
17
18
19
20
21
22
23
24
25
26
27
28
29
30
31
32
[Serializable]
public class SerializableInputBinding
{
    public BindPair[] bindPairs;

    public SerializableInputBinding(InputBinding binding)
    {
        int len = binding.Bindings.Count;
        int index = 0;

        bindPairs = new BindPair[len];

        foreach (var pair in binding.Bindings)
        {
            bindPairs[index++] =
                new BindPair(pair.Key, pair.Value);
        }
    }
}

[Serializable]
public class BindPair
{
    public UserAction key;
    public KeyCode value;

    public BindPair(UserAction key, KeyCode value)
    {
        this.key = key;
        this.value = value;
    }
}
5. 저장, 불러오기 구현
- 우선 SerializableInputBinding 클래스를 InputBinding 클래스에서 빠르게 변환하여 사용할 수 있도록 새로운 생성자와 메소드를 작성한다.
1
2
3
4
5
6
7
8
9
10
11
12
13
14
15
16
17
18
19
20
// 생성자
public InputBinding(SerializableInputBinding sib)
{
    _bindingDict = new Dictionary<UserAction, KeyCode>();

    foreach (var pair in sib.bindPairs)
    {
        _bindingDict[pair.key] = pair.value;
    }
}

public void ApplyNewBindings(SerializableInputBinding newBinding)
{
    _bindingDict.Clear();

    foreach (var pair in newBinding.bindPairs)
    {
        _bindingDict[pair.key] = pair.value;
    }
}
- 저장, 불러오기 메소드를 작성한다.
- 로컬 또는 서버 등 환경에 따라 구현할 수 있다.
- 여기서는 로컬로 구현하였으며, 구현부는 본문에서 생략하였다.
1
2
3
4
5
6
7
8
9
10
11
12
13
14
15
16
17
18
19
20
21
public void SaveToFile()
{
    SerializableInputBinding sib = new SerializableInputBinding(this);
    string jsonStr = JsonUtility.ToJson(sib);

    LocalFileIOHandler.Save(jsonStr, filePath); // Save
}

public void LoadFromFile()
{
    string jsonStr = LocalFileIOHandler.Load(filePath); // Load

    if (jsonStr == null)
    {
        Debug.Log("File Load Error");
        return;
    }

    var sib = JsonUtility.FromJson<SerializableInputBinding>(jsonStr);
    ApplyNewBindings(sib);
}
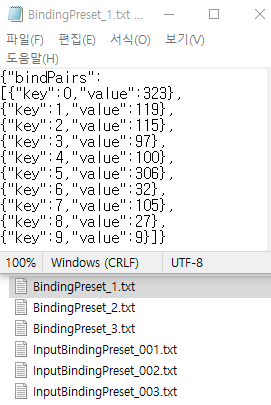
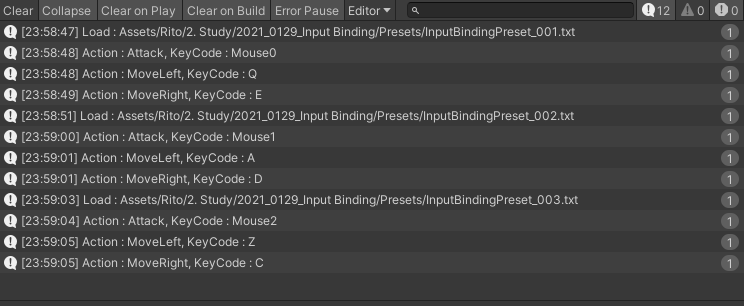
구현 결과
- 바인딩 저장 파일 내용
- Input 클래스를 통한 키 입력
- 파일로부터 읽어들인 바인딩 설정에 따라 동일한 기능에 대해 입력받는 키값이 달라진다.
1
2
3
4
5
6
7
8
9
10
11
12
13
14
15
16
17
18
19
20
21
22
23
24
25
26
27
public InputBinding _binding = new InputBinding();

private void Start()
{
    _binding.LoadFromFile();
}

private void Update()
{
    if (Input.GetKeyDown(_binding.Bindings[UserAction.MoveLeft]))
    {
        LogBindingInfo(UserAction.MoveLeft);
    }
    if (Input.GetKeyDown(_binding.Bindings[UserAction.MoveRight]))
    {
        LogBindingInfo(UserAction.MoveRight);
    }
    if (Input.GetKeyDown(_binding.Bindings[UserAction.Attack]))
    {
        LogBindingInfo(UserAction.Attack);
    }
}

private void LogBindingInfo(UserAction action)
{
    Debug.Log($"Action : {action}, KeyCode : {_binding.Bindings[action]}");
}
- 추가 : UI를 통한 바인딩 변경 기능 구현